Preparation of the Active Directory
The following settings must be made in the Active Directory (AD), which is to be used for user administration of the TightGate-Pro, for the connection of a TightGate-Pro:
- A computer account for TightGate-Pro must be created and configured on the AD server.
- The DNS setting must then be made so that TightGate-Pro can be found in the network by the client PCs.
- The next step is to create a keytab file for authenticating TightGate-Pro on the AD server.
- In the last step, the security groups required for TightGate-Pro must be created in the AD.
Creating a computer account
Firstly, a computer account must be created on the AD server in the correct domain. This applies equally to individual systems and cluster systems. In our example, the computer account is called tgpro.
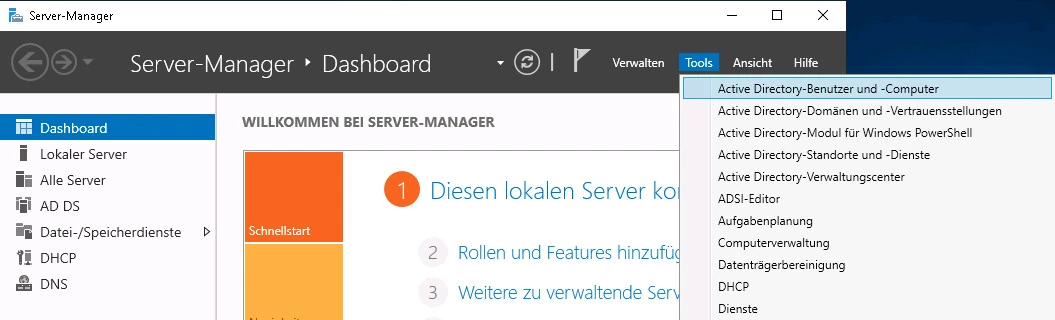
A computer account is created in the Server Manager via the menu item Tools > Active Directory Users and Computers menu item, as shown in the following illustration:
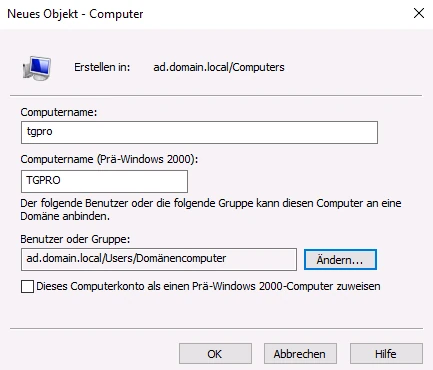
There (as shown in the following figure) in the correct domain, right-click on Computer and then in the context menu under New > Computer to open a dialogue window for creating a new computer account.

The name of the computer account can be freely selected, in our example the computer is given the name tgpro.
After creation, the computer account must be further customised and the attributes required for communication must be set. For this to be possible, the Active Directory users and computers window under View the option Advanced features can be selected.

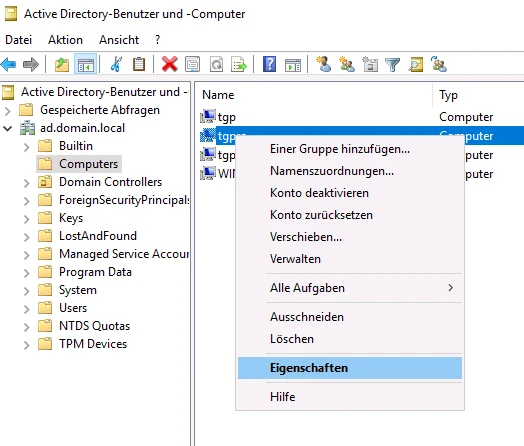
Now select the newly created computer from the list of existing computers. Right-click on the computer (in our example tgpro), the context menu opens, from which the menu item Properties menu item.
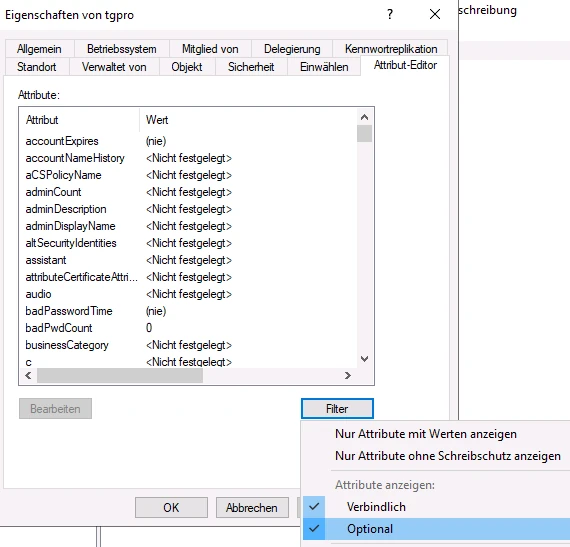
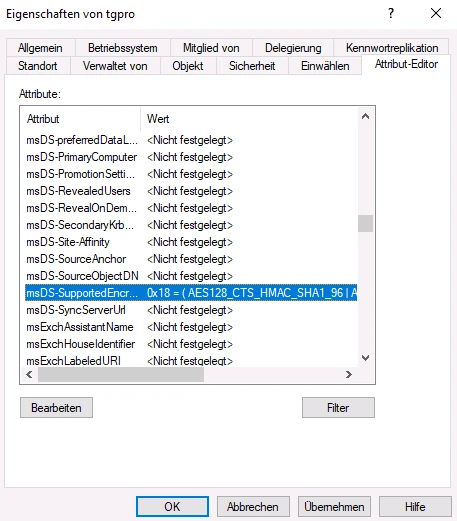
The properties menu for the computer account opens, in which the tab Attribute editor tab should be selected. To ensure that all attribute values can be set correctly, click on the filter button and make sure that under Show attributes > Optional is ticked.
In the list of attributes, the attribute msDS-SupportedEncryption Types has the decimal value 24 (hexadecimal 0x18) must be set. To do this, select the relevant parameter in the selection list by clicking on it with the left mouse button (coloured background visible) and click on the Edit button to enable changes. Once the value has been set, it can be changed using the Apply button.
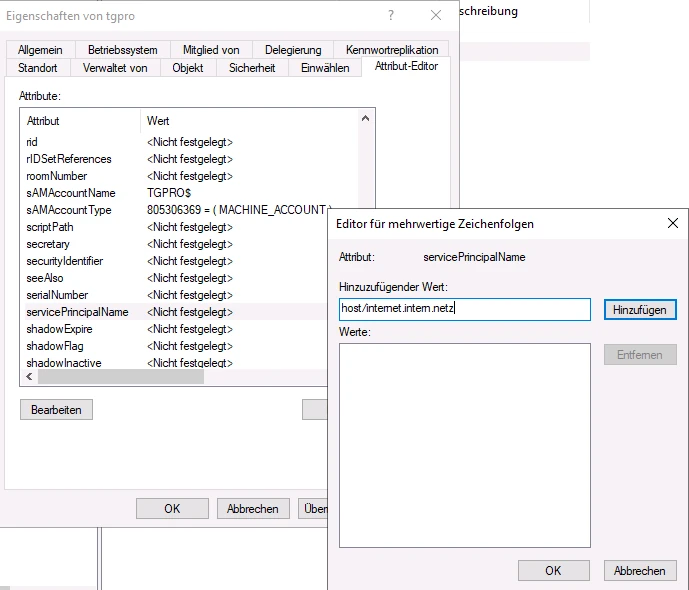
In the next step, the attribute servicePrincipalName attribute is set. The value follows the scheme host/[DNS name in the certificate]. The entry for our example is therefore host/internet.intern.netz
The value is in the field Value to be added field and then click the Add button to add it to the system. You can then click on the OK button to accept the value. The attribute editor can then be closed with the OK button to close the attribute editor.
Hint
The DNS name in the certificate is the value entered in TightGate-Pro as administrator config under Basic settings > DNS name in the certificate is set.
Create DNS entries
The type of DNS entry for TightGate-Pro differs depending on whether TightGate-Pro is operated as a single system or as a cluster system. While a simple host entry is sufficient for individual systems, DNS zone forwarding must be set up for cluster systems so that the load distribution of users to the individual nodes of TightGate-Pro functions correctly.
DNS entry for TightGate-Pro individual systems
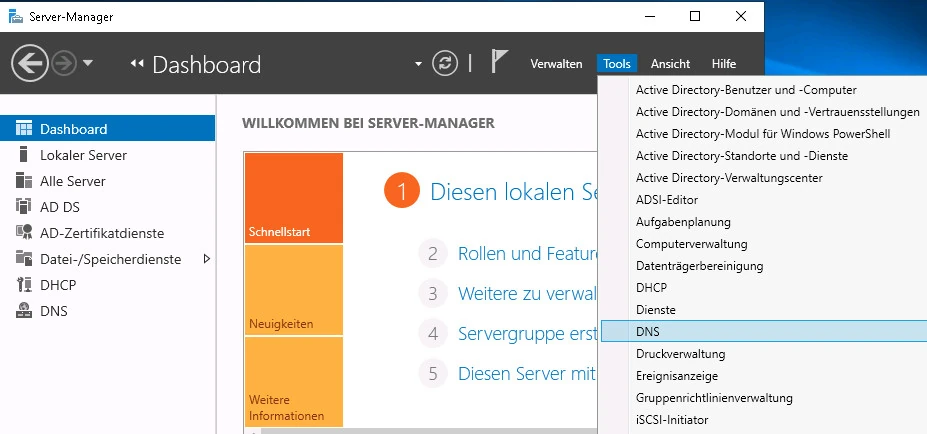
In the Server Manager, click on Tools > DNS.
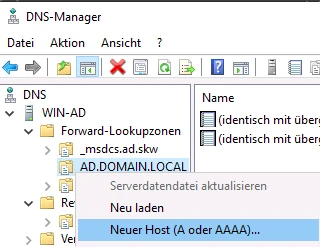
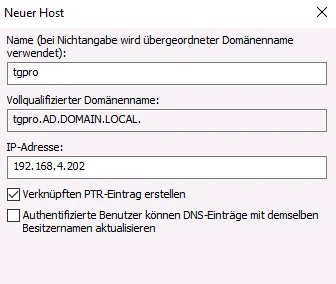
The menu tree under DNS server must be expanded until the available forward lookup zones are visible. After clicking with the right mouse button on the corresponding domain of the AD (ADS-REALM), in this example AD.DOMAIN.LOCAL, you can click on New host (A or AAAA) … a dialogue can be called up via which TightGate-Pro can be assigned.
The resolvable name of TightGate-Pro and the IPv4 address of the server must be entered as the name. The checkbox Create linked PTR entry checkbox must be activated so that the host name is also automatically entered in the reverse lookup zone. The dialogue box can be opened via the Add host button to exit the dialogue box. It is recommended to check whether the name of TightGate-Pro can be correctly resolved forwards and backwards.
DNS setup for TightGate-Pro cluster
In order for load balancing to work properly in TightGate-Pro clusters, the individual computers in the cluster must not be addressed by the client computers using their dedicated IPv4 address or host name. Instead, the entire TightGate-Pro cluster must appear as a unit in the internal network. All connection requests to TightGate-Pro must be transferred to special nodes that fulfil the task of load balancing.
This is achieved by sending the connection requests to a central computer name (own DNS zone) that represents the computer cluster.
The following instructions describe how to set up DNS zone forwarding.
Hint
Under this link you will find an explanation and schematic representation of the connection paths for the use of "DNS Zone Forwarding". It also describes what needs to be configured if there is a NAT implementation between the internal network and TightGate-Pro.
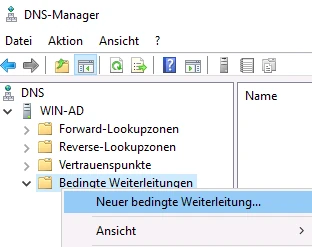
Set up conditional forwarding
A new conditional forwarding is created via the DNS Manager in the relevant domain via the menu item Conditional forwarding > New conditional forwarding…
In the dialogue window that opens, under DNS domain enter the domain name of the TightGate-Pro cluster (in the example: internet.intern.netz). In addition, the IPv4 addresses of the defined load balancers of the TightGate-Pro cluster must be entered as IP addresses of the master servers must be added. In the example, the IPv4 addresses of the LAN interfaces of the first two TightGate-Pro are added, as these act as load balancers in the example.
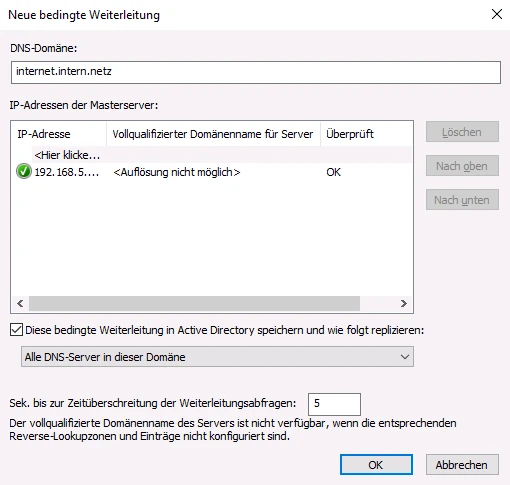
Next, the box next to the seconds until the timeout of the forwarding queries one 5 in the box next to the seconds until the forwarding query times out. Finally, confirm the settings with OK and exit the dialogue window.
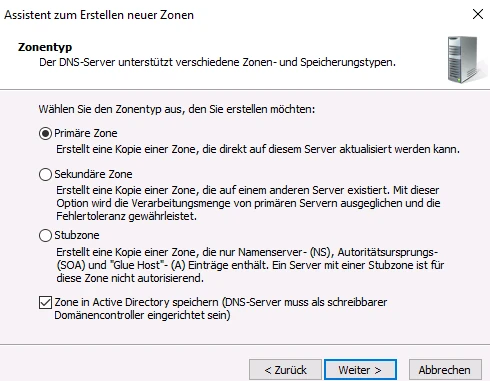
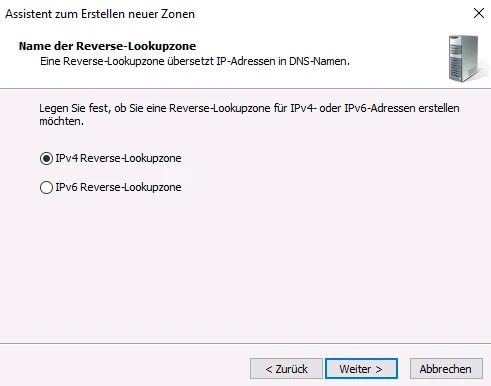
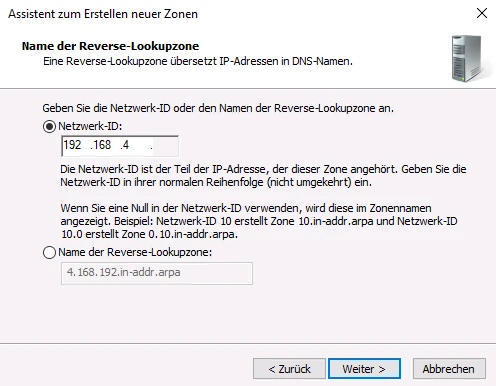
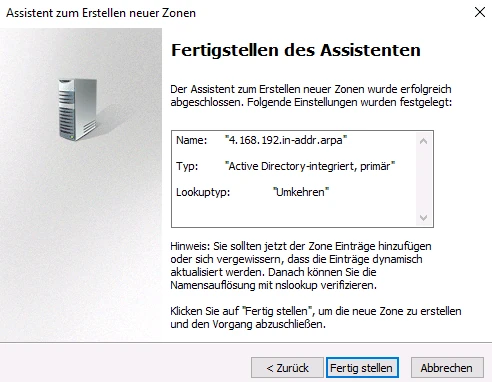
Set up the associated reverse resolution (reverse lookup zone)
An associated reverse resolution is created via the DNS Manager in the relevant domain via the menu item Reverse lookup zones > New zone…
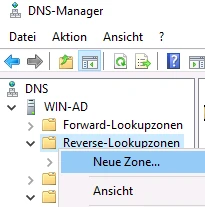
Follow the wizard to create a reverse lookup zone for the domain of the cluster of TightGate-Pro (in the example internet.intern.netz).
Create keytab file
A keytab file is required so that TightGate-Pro can authenticate itself on the AD. This keytab file is generated once on the AD and then imported to TightGate-Pro.
Attention
Please make sure that you import the keytab file with a user ID that is stored in the standard security group administrator of the Active Directory. It is possible to create a keytab from another security group, e.g. domain administrators or enterprise administrators, but it is not possible to authenticate TightGate-Pro requests on the Active Directory server.
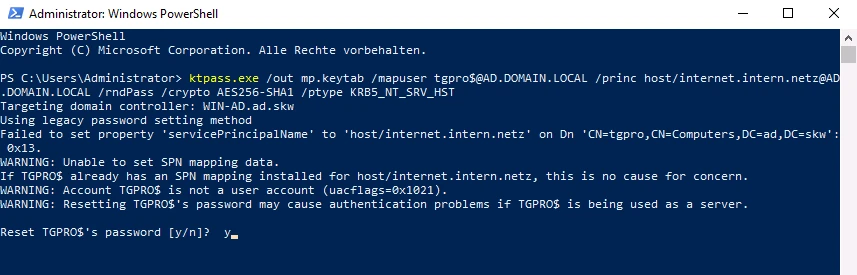
To create a keytab file, you need either a PowerShell or a command prompt (CMD) with administrative rights. The command to create the keytab file on the AD server is issued via the Windows Power Shell and has the following format:
ktpass.exe /out [Dateiname] /mapuser [Computer-Name von TightGate-Pro]$@[ADS-REALM] /princ host/[DNS-Name im Zertifikat]@[ADS-REALM] /rndPass /crypto AES256-SHA1 /ptype KRB5_NT_SRV_HST
The command line reads accordingly for our example:
ktpass.exe /out mp.keytab /mapuser tgpro$@AD.DOMAIN.LOCAL /princ host/internet.intern.netz@AD.DOMAIN.LOCAL /rndPass /crypto AES256-SHA1 /ptype KRB5_NT_SRV_HST
The confirmation question is marked with y (Yes).
Attention
The command must be entered without line breaks and only with spaces between keywords and parameters. It is essential to observe upper/lower case.
The following overview explains the meaning of the parameters when creating the keytab file:
| Keyword | Description | Example value |
|---|---|---|
| /out | Name of the output file. Caution: This file name must always end with .keytab. | mp.keytab |
| /mapuser | Specifies the target system for which the generated keytab file should apply, in this case TightGate-Pro. | tgpro@AD.DOMAIN.LOCAL |
| /princ | Specifies the principal name | host/internet.intern.netz@AD.DOMAIN.LOCAL |
| /rndPass | Password randomly generated by the system. | No value needs to be set. |
| /crypto | Specifies the encryption. Caution: Only the value AES256-SHA1 can be used. | AES256-SHA1 |
| /ptype | Specifies the headmaster type. Caution: Only the value KRB5_NT_SRV_HST can be used. | KRB5_NT_SRV_HST |
Transfer keytab file to TightGate-Pro
Once the keytab file has been created, it must be transferred to TightGate-Pro. The transfer takes place via the SFTP protocol; the WinSCP programme is best suited for this. Open WinSCP and create a connection to TightGate-Pro. As the user, use the identifier config with the corresponding password from your password list. Once you have created the connection, copy the generated keytab file directly into the transfer directory (/home/user/.transfer/config) of config and then close WinSCP. Transfer to TightGate-Pro and test the settings as described below.
Please now create the AD security groups as described below, after which TightGate-Pro can be configured as described einrichtung_tightgate-pro can be configured as described here.
Create AD security groups
In order for the group administration of TightGate-Pro to be transferred correctly to the Active Directory, the corresponding security groups must be created on the Active Directory. Creating or changing a user (or group of users) is done by adding or removing them from the defined security groups in AD. For example, if a user is a member of the security group TGProUsersecurity group, he can log in. The other options for the user are defined by the membership in the corresponding security groups.
Warning
The names (group names) of the security groups of TightGate-Pro in the Active Directory must contain the group name. Characters can be added before and after the group name. If the group name is not included in the name of the security group, the TightGate-Viewerlogin to TightGate-Pro will fail.
This is how it works
To change the desired attributes for a user or user group, the memberships of the relevant users or user groups must be added or removed from the security groups. The attributes take effect the next time the user logs on to TightGate-Viewer. The following table provides an overview of all security groups available for TightGate-Pro with a description and recommendation:
| Group name | Authorisation to TightGate-Pro | Recommendation for normal users |
|---|---|---|
| TGProUser | User authorisation from TightGate-Pro | Yes |
| TGtransfer | User authorisation for the file transfer. Authorisation can only be granted or withdrawn via this group. Further configuration with regard to transfer directions and permitted file types is only possible via membership in the group(s) TGtransferN group(s). | Yes |
| TGtransferN | Transfer group N, for defining permitted MIME TYPES for file transfer. Example: tgtransfer1, case-insensitive, tgtransfer01 with leading 0 does not work. If a user is in several transfer groups, the rights of the individual groups are cumulated. Membership of the group TGtransfer group is mandatory for use. Up to 99 transfer groups can be defined on TightGate-Pro . | Yes |
| TGaudio | Authorisation for sound transfer from the Internet | Yes |
| TGtransferSpool | Authorisation for automatic print output on the Windows workstation. | Yes |
| TGunfiltered | Authorisation to use the Internet without content filtering from TightGate-Pro | Yes |
| TGchromeicon | Display of the Chrome browser in the menu bar of TightGate-Viewers | Optional |
| TGopswat | Assignment of the file transfer via OPSWAT. Membership of this group is mandatory if OPSWAT is to be used. If an identifier is not in this group, OPSWAT is not used and all group memberships in the TGopswatN-groups are ignored. In order for OPSWAT to be used effectively, membership in a TGopswatN-group must also be set. If there is no membership in a TGopswatN-group, the standard OPSWAT rule is always used. | Optional |
| TGopswatN | OPSWAT group 1-9 to assign the OPSWAT rule to be used. The group TGopswatN group assigns the OPSWAT rule to be used to a user. Only one TGopswatN-group may be used per user, otherwise errors may occur. The TGoposwatN-groups correlate with the groups defined as config created as OPSWAT rules. Example: tgopswat1, upper and lower case does not matter, tgopswat01 with leading 0 does not work. | Optional |
| TGtoricon | Display of the TOR browser in the menu bar of the TightGate-Viewers –> Instructions for using the TOR browser in TightGate-Pro | Optional |
| TGbebpoicon | Display of the beBPo client in the menu bar of the TightGate-Viewers –> Instructions for using the special electronic mailbox for public authorities (beBPo) in TightGate-Pro | Optional |
| TGfiltergroupN | Web filter group N; for assigning the mandatory use of the web filter. Only one web filter group is used per user. If a user is in several web filter groups, TightGate-Pro automatically only uses the rights from the highest web filter group. Rights from several groups are not accumulated. Up to 99 web filter groups can be defined. Example: tgfiltergroup1, case-insensitive, tgfiltergroup01 with leading 0 does not work. | Optional |
| TGmaxfilesize | Members in this group may process files larger than 4GB. | Optional |
| TGtransferAuto | Authorisation to use the automatic file transfer. | Optional |
| TGnoidleTimeout | Selection of whether the identifier is excluded from the forced disconnection on inactivity. The disconnection when the maximum session duration is reached is not cancelled. | Optional |
| TGstartpdf | Members of this group are shown a PDF file each time they log in with TightGate-Viewer in order to read the terms of use (created by the operator). The PDF file must be stored in advance at TightGate-Pro. –> Instructions for displaying customised terms of use | Optional |
| TGbandwidth | Use of the bandwidth optimisation of TightGate-Viewers. The display quality is reduced by one level, but the required bandwidth is significantly reduced. | Recommended for WAN |
| TGbandwidthhigh | Use of the maximum bandwidth optimisation of TightGate-Viewers. Compression is maximised at TightGate-Pro. The bandwidth utilisation shrinks to a fifth of the normal bandwidth with this compression, but the CPU consumption at TightGate-Pro increases significantly. Warning: This compression level requires very high CPU resources on TightGate-Pro AND on the local workstation PC, which can impair the performance of the entire TightGate-Pro system. Please contact the technical support team at m-privacy GmbH for advice before implementing this compression. | No |
| TGprivileged | Additional authorisation to log in as a privileged user. Membership of the security group TGProUser security group and a TightGate-Pro licence that allows privileged users. | No |
| TGadminMaint | Login as administrator maint | No |
| TGadminConfig | Login as administrator config | No |
| TGadminUpdate | Login as administrator update | No |
| TGadminBackuser | Login as administrator backuser | No |
| TGadminRoot | Login as administrator root | No |
| TGadminSecurity | Login as administrator security | No |
Hint
Expired passwords also block user accounts that log in with single sign-on (SSO) via Active Directory. If SSO via Active Directory is used, it is recommended not to use the local password or to deactivate it.
Remove/delete user
A user is removed by removing them from all security groups of TightGate-Pro in AD. After removal from the security groups, the user can no longer log in to TightGate-Pro. If the user account on TightGate-Pro is to be deleted completely, please follow these instructions dieser Instructions.
Notes on deletion for user administration via Active Directory The complete deletion of a user is only effective if the user is also removed from the security groups TGProUser and TGtransfer security groups in the Active Directory. Otherwise, the user is automatically recreated when the user in question attempts to log in.